April 7, 2026
Spring storms can be rough on our homes, and sometimes that means our roofs take a beating. When the wind howls and the rain pours, we might find ourselves dealing with leaks or even visible damage. It’s a stressful situation, no doubt. We want to get things sorted quickly to stop any further problems. This guide is here to help us figure out what to do next, from checking the damage to getting it fixed right.
Key Takeaways
- After a storm, we need to check our roofs for any damage and know when it’s time to get professional help, especially for emergency roof repair services.
- Putting a tarp on a damaged roof correctly is important to stop more water from getting in and causing problems.
- When dealing with insurance after storm damage, taking good pictures and working with the adjuster helps make the repair process smoother.
Immediate Steps For Storm-Damaged Roofs
Spring storms can leave us scrambling. Shingles get torn away, branches crash down, and water comes sneaking in through new leaks. When the weather finally calms, we should act fast to limit extra trouble inside and outside our homes. Here are the best steps to follow right after the clouds part.
Assessing Roof Damage After A Storm
First things first, let’s check out the situation. Before climbing up, think about safety—sometimes it’s better to look from the ground or use binoculars.
- Walk around the house and scan for obvious problems—missing shingles, bent flashing, or loose gutters.
- Peek inside your attic for signs of water spots or dripping.
- If possible, take pictures and write down what you notice; this will help later if you need repairs or file a claim.
Blockquote:
Acting quickly can help us hold off bigger issues while we figure out the best repair plan.
When To Call For Emergency Roof Repair Services
Sometimes we spot small troubles, other times we spot real emergencies. So, when do we get professionals involved?
- If water is pouring in or steadily leaking, and we can’t patch it ourselves, call a pro.
- Notice large sections of roof are loose, missing, or caved in? Don’t hesitate—get help right away.
- If it’s just minor shingle loss and there’s no way for water to get in, we might have some time, but it’s better to call soon rather than wait.
Here’s a quick table to help decide:
| Situation | Action |
|---|---|
| Minor shingle damage | Temporary DIY patch or tarp |
| Significant leaking | Emergency repair services call |
| Major structural issues | Evacuate, call professionals |
| Light water stains indoors | Monitor, plan for repair |
After a storm, the best move is steady, clear-headed steps to limit damage and set up repairs before rain hits again.
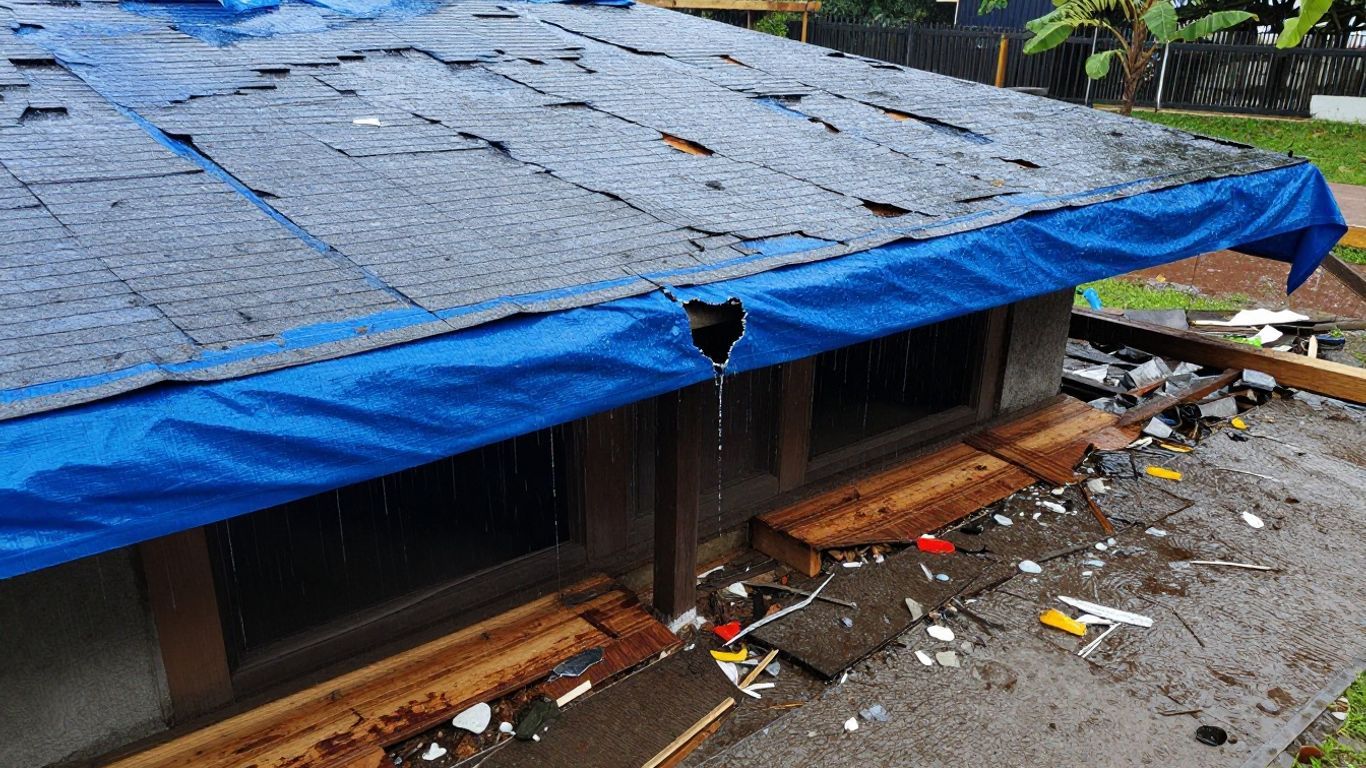
Effective Roof Tarping Techniques
When a storm hits and your roof takes a beating, getting a tarp up quickly is a big deal. We’ve seen it ourselves – a small leak can turn into a major headache if it’s not addressed. Proper tarping isn’t just about throwing a sheet over the hole; it’s about making sure that temporary fix actually works and doesn’t cause more problems.
Securing Tarps To Prevent Further Damage
Getting the tarp to stay put is half the battle. You don’t want it flapping around in the wind, tearing off, or worse, pulling off shingles it’s supposed to protect. We usually start by clearing the area around the damage. This means removing any loose debris that could snag the tarp or get under it.
Here’s a general approach we take:
- Identify the high points: Find sturdy points on the roof, like vents or chimneys, that are well-attached. These are good spots to anchor your tarp.
- Create a slope: The tarp needs to shed water. We aim to create a slope so rain runs off away from the damaged area and doesn’t pool up.
- Use plenty of fasteners: We use heavy-duty staples, screws with washers, or even sandbags if we can’t secure it directly to the roof structure. The key is to use more than you think you need.
- Overlap generously: If you need multiple tarps, make sure they overlap significantly, like shingles, to prevent water from seeping through the seams.
The goal is to create a watertight barrier that can withstand wind and rain until a permanent repair can be made.
Temporary Patching For Minor Leaks
Sometimes, the damage isn’t a gaping hole but a series of smaller issues, like cracked shingles or a few missing ones. For these, a full tarp might be overkill, and a more targeted patch can do the trick. We’ve found that using roofing cement and some spare shingles can often seal up these smaller problems effectively.
- Clean the area: Make sure the damaged spot is dry and free of debris. You want the patch to stick well.
- Apply roofing cement: Use a trowel to spread a generous amount of roofing cement under and around the damaged shingles.
- Replace or cover: If shingles are missing, slide new ones into place. If they’re cracked, press them down firmly into the cement. For very small holes, a piece of roofing felt secured with cement can work.
- Weight it down: Place something heavy on top of the patched area for a few hours to help it set.
It’s important to remember that these are temporary solutions. They buy us time, keeping the interior dry and preventing further deterioration, but they are not a substitute for professional roof repair. We always recommend getting a professional assessment soon after applying any temporary fix.
We’ve learned that taking these steps can make a real difference in minimizing water damage after a storm. It’s about being prepared and knowing how to react when the unexpected happens.
Navigating Insurance Claims For Roof Repairs
Handling roof repairs after a wild spring storm isn’t just about patching up leaks or tossing a tarp—you also have to deal with your insurance company. The paperwork and calls can get overwhelming fast, especially after a night of thunder and rattling shingles. Here’s how we handle the insurance side when our roofs take a hit.
Documenting Storm Damage For Your Insurer
We always start with proof. After everything calms down and it’s safe to step outside, we:
- Take clear photos of all roof damage—missing shingles, damaged gutters, and even water spots on ceilings inside.
- Jot down the date and time of the storm and make notes about what happened during the worst of it (hail, high winds, falling branches).
- Keep a folder with repair receipts and any written estimates we get from roofing companies.
| Documentation Step | Purpose |
|---|---|
| Photos | Visual proof for claims |
| Written Notes | Timeline and details |
| Estimates/Receipts | Shows cost and urgency of work |
Even a quick snapshot with your phone can make all the difference if your adjuster needs backup later.
Working With Your Insurance Adjuster
Once we’ve filed the claim, most insurance companies send an adjuster. This person checks out the damage and decides what the company will cover. We’ve found these steps help:
- Schedule a time when we can be home to answer questions and walk the property with the adjuster.
- Share all our photos, roof repair estimates, and notes in one place.
- Ask questions about what’s covered and what the next steps are—no need to rush.
Being upfront and organized usually means fewer headaches and fewer delays in getting our roof fixed. If we ever disagree with their findings, we don’t hesitate to ask for a review or a second opinion from a trustworthy contractor.
Going step by step with insurance might not be fun, but a clear record and solid communication make the process a whole lot smoother.
Moving Forward After the Storm
We’ve covered how to get a tarp up quickly when the rain won’t stop and what to do when you find water where it shouldn’t be. Dealing with storm damage is never fun, and it often happens at the worst times. Remember, taking quick action with tarping can really make a difference in stopping further damage to your home. Don’t wait too long to get a professional assessment and permanent repairs done. Staying prepared and knowing these steps can help us all get through storm season a little easier.
Frequently Asked Questions
What should we do first if our roof starts leaking after a spring storm?
If our roof starts leaking after a storm, our first step should be to safely check for any visible damage from the ground. We should avoid climbing onto the roof ourselves, especially if it is still wet or damaged. Placing buckets under leaks and moving belongings out of the way can help limit water damage inside. Then, we should contact a professional roofing company for emergency help.
How long can we leave a tarp on our roof before getting it fixed?
A tarp is only a temporary fix. We should try to get our roof repaired as soon as possible, usually within a few days or weeks. Leaving a tarp on for too long might let water seep in and cause more problems, like mold or wood rot. The sooner we get a professional repair, the better it is for our home.
What information do we need to give our insurance company after storm damage?
We should take clear photos of all the damage, both inside and outside. Writing down the date and details of the storm helps too. When we call our insurance company, we should share these photos and notes. This makes it easier for them to understand what happened and process our claim faster.
The post emergency roof tarping and leak response after spring storms first appeared on Taylore Roofing.