March 17, 2026
As the weather warms up this spring, it’s a good time to check on our homes. One area that often needs attention after winter is the chimney. Specifically, the roofing chimney flashing plays a big part in keeping water out. We’re going to look at why this flashing is so important and what we can do to make sure it’s doing its job properly. A little attention now can save us a lot of trouble later.
Key Takeaways
- Roofing chimney flashing stops water from getting into your attic and walls. When it’s damaged, leaks can start.
- We should look for signs like cracked sealant, rust, or missing pieces on our chimney flashing. Doing a spring check is smart.
- Picking the right metal for your flashing and having it put on right helps it last longer. Sometimes it’s best to call a pro for this job.
Understanding the Importance of Roofing Chimney Flashing
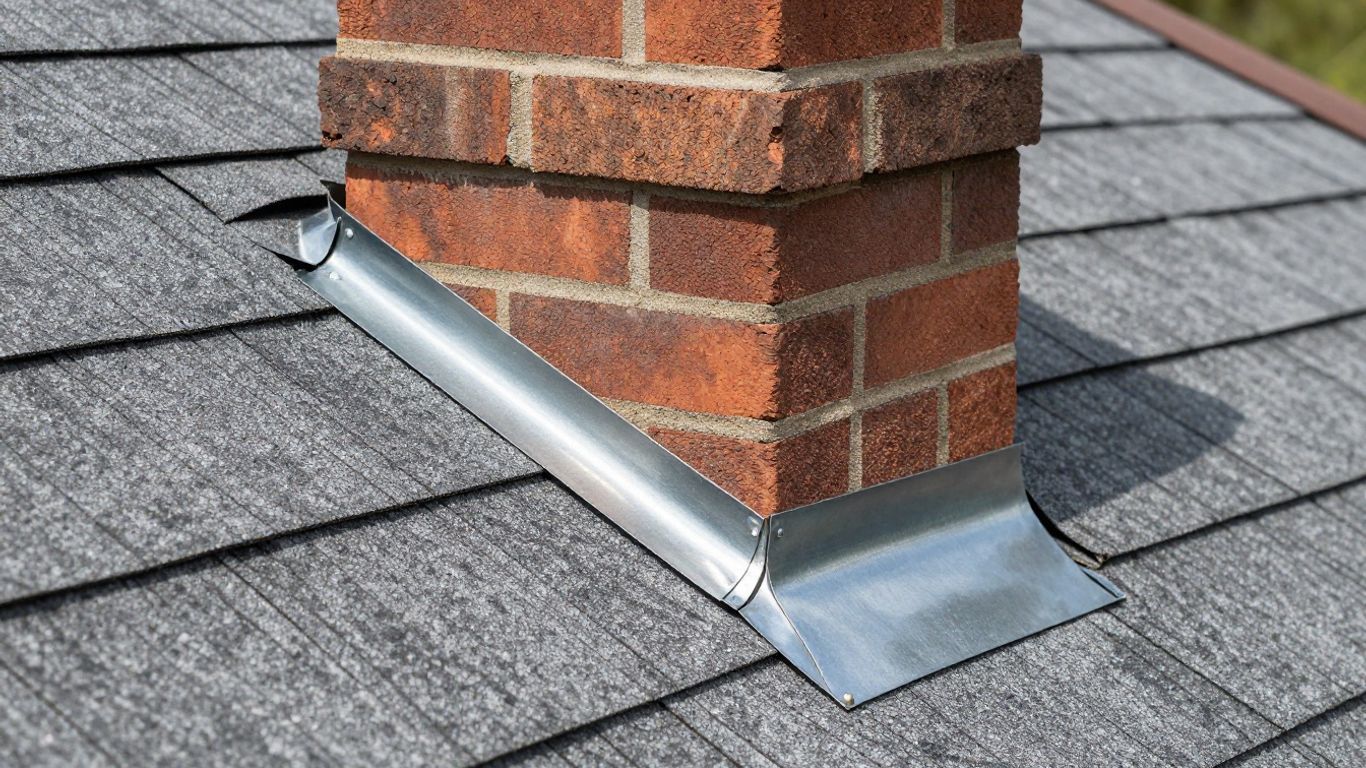
When we think about our homes, we often focus on the big things – the walls, the roof itself, maybe the windows. But there are smaller, often overlooked parts that play a huge role in keeping our houses safe and dry. Chimney flashing is one of those things. It’s that metal strip, usually made of aluminum, galvanized steel, or copper, that seals the gap where the chimney meets the roof. Without it, water has a direct path inside.
How Flashing Prevents Water Intrusion
Think of flashing as a raincoat for the vulnerable spot where your chimney sticks out of your roof. Rain, snowmelt, even dew can run down the chimney and pool at the base. If there’s no proper flashing, or if it’s damaged, that water will find its way into your attic, down your walls, and can cause all sorts of problems. We’re talking about wood rot, mold growth, damaged insulation, and even structural issues over time. Properly installed and maintained flashing is our first line of defense against these water-related headaches. It’s designed to direct water away from the chimney and onto the roof surface, where it can then flow down to the gutters as intended.
Common Signs of Failing Chimney Flashing
So, how do we know if our flashing is doing its job, or if it’s starting to give us trouble? We need to keep an eye out for a few key indicators. It’s not always obvious, but paying attention can save us a lot of grief later on.
- Water Stains: Look for discoloration or damp spots on your attic ceiling, especially around the chimney. This is a pretty clear sign water is getting in.
- Damp or Moldy Chimney Interior: If you notice moisture or mold on the bricks or mortar inside your fireplace or chimney, it could be related to flashing issues.
- Loose or Damaged Flashing: Visually inspect the metal flashing around the base of the chimney. Is it bent, cracked, rusted, or pulling away from the chimney or roof? Sometimes, you might even see small pieces of metal debris on the roof near the chimney.
- Peeling Paint: If the paint on your interior walls near the chimney is peeling or bubbling, it might be due to moisture seeping through.
We often forget about the details, but these small components are what truly protect the integrity of our homes. Ignoring them is like leaving a tiny crack in a dam – eventually, it’s going to cause a much bigger problem.
Steps for Inspecting and Maintaining Chimney Flashing This Spring
When spring rolls around, we always make it a point to walk around the house. This is the perfect time for us to check our chimney flashing before rainy weather hits. Even if the roof looks fine from the ground, a closer look can help us avoid water leaks and bigger roof problems down the line.
Visual Inspection Tips for Homeowners
A basic inspection doesn’t need fancy tools or advanced knowledge. Here’s how we usually go about it:
- Grab a sturdy ladder and make sure it’s on firm, level ground.
- Carefully climb up to roof level so we can see the flashing around the chimney.
- Look for obvious damage, like rust spots, cracks, gaps, and sections where the flashing looks pushed up or bent.
- Check for any loose or missing nails along the flashing edges.
- Feel for soft or spongy areas near the base of the chimney, which might mean water has already started to work its way in.
If any area looks questionable, we snap a few photos to compare with last year’s inspection, so we know what’s new and what’s been there for a while.
In our experience, catching small problems now keeps repairs simple and costs low. Ignoring flashing issues can quickly turn a minor fix into a real headache.
Essential Spring Maintenance for Roofing Chimney Flashing
After inspection, we usually take care of a few quick maintenance tasks before the weather turns. These steps help keep the chimney flashing in good shape all year:
- Remove leaves, twigs, or debris that might trap moisture next to the flashing.
- If we spot minor gaps or cracks, apply a roof-safe sealant made for metal or masonry, depending on the joining surfaces.
- For light rust, we use a wire brush to clear it away and touch up with rust-inhibiting paint to slow further corrosion.
- Check nearby shingles or roofing materials for damage, since water finds the path of least resistance.
| Task | Frequency | Supplies Needed |
|---|---|---|
| Visual inspection | Every spring | Ladder, gloves, camera |
| Debris removal | Every spring | Work gloves, broom |
| Sealant application | As needed | Roof-safe sealant, gun |
| Rust removal/paint touchup | As needed | Wire brush, paint |
Regular attention to these small details each spring is the easiest way we’ve found to prevent chimney flashing leaks and the headaches that come with them.
Choosing the Right Materials for Durable Chimney Flashing
When we talk about keeping our homes dry, the materials used for chimney flashing really matter. It’s not just about slapping some metal around the chimney base; it’s about picking the right stuff that will last and do its job, especially when the weather gets rough. We want something that can handle sun, rain, snow, and temperature changes without falling apart or letting water sneak in.
Comparing Metal Options for Flashing
There are a few common metal choices for flashing, and each has its pros and cons. What works best often depends on your climate, the type of roof you have, and how long you want it to last.
- Galvanized Steel: This is a popular choice because it’s pretty affordable and readily available. It’s steel that’s been coated with zinc to help prevent rust. It’s strong, but the zinc coating can wear away over time, especially in areas with a lot of rain or salt in the air. We’ve seen it start to corrode after about 10-15 years if not maintained.
- Aluminum: Lighter than steel and it won’t rust, which is a big plus. However, aluminum can be softer and more prone to damage from impacts, like hail. It’s a good option for milder climates, but we might need to be more careful with it.
- Copper: This is the premium choice, no doubt about it. Copper is incredibly durable and naturally resistant to corrosion. It develops a beautiful patina over time, which some people really like. It’s also very flexible, making it easier to shape around roof details. The downside? It’s significantly more expensive than steel or aluminum. If you’re looking for something that will last for decades and don’t mind the cost, copper is hard to beat.
- Stainless Steel: Similar to galvanized steel but with a better, more consistent rust resistance. It’s strong and holds up well in harsh conditions. It’s a good middle-ground option if you want better durability than galvanized steel without the high cost of copper.
Here’s a quick look at how they stack up:
| Material | Cost | Durability | Rust Resistance | Notes |
|---|---|---|---|---|
| Galvanized Steel | Low | Good | Fair | Zinc coating can wear off |
| Aluminum | Medium | Fair | Excellent | Can be dented easily |
| Copper | High | Excellent | Excellent | Develops a patina, most expensive |
| Stainless Steel | Medium-High | Very Good | Very Good | Strong, good in tough environments |
Professional Installation Versus DIY Approaches
Deciding whether to tackle flashing work ourselves or hire a pro is a big question. For us, it often comes down to the complexity of the job and our comfort level with roofing work.
- DIY: If you’ve got a simple roofline and some experience with basic home repairs, a DIY approach might be feasible. You’ll need the right tools, like a good metal snips, a hammer, sealant, and safety gear. It can save money, but mistakes can be costly down the line if the flashing isn’t installed correctly. We’ve found that even small errors can lead to leaks that are hard to track down later.
- Professional Installation: For most homeowners, especially those with complex roof designs or who aren’t comfortable working at heights, hiring a professional roofer is the way to go. They have the specialized tools, the knowledge of building codes, and the experience to get it done right the first time. A properly installed flashing system is key to preventing water damage. They can also advise on the best materials for our specific home and climate.
When we’re considering flashing, we’re really looking at a long-term investment in our home’s protection. The cheapest option upfront might end up costing us more in repairs if it fails prematurely. It’s worth taking the time to understand the materials and the installation process, whether we’re doing it ourselves or hiring someone.
Wrapping Up Our Chimney Flashing Check
So, as we head into spring, we’ve looked at why keeping our chimney flashing in good shape is a smart move. It’s not the most exciting topic, we know, but a little attention now can save us a lot of trouble later. We’ve talked about how water can sneak in and cause damage, and how checking and fixing that metal trim around the chimney is the best way to stop it. If you’re not comfortable doing it yourself, that’s totally fine. Just get a professional to take a look. A small repair now is way better than dealing with a big leak down the road. Let’s keep our homes dry and sound.
Frequently Asked Questions
Why is chimney flashing so important for our roof?
Chimney flashing helps keep water from sneaking into our home where the chimney meets the roof. If the flashing is in good shape, it stops leaks and keeps our attic and walls dry.
How can we tell if our chimney flashing needs to be fixed?
We should look for signs like water stains on the ceiling, peeling paint near the chimney, or pieces of metal sticking up. If we see these problems, the flashing might be loose or broken.
Is it better for us to fix chimney flashing ourselves or hire a professional?
While small checks and cleaning can be done by us, fixing or replacing flashing is tricky. If we are not sure how to do it, it’s safer to call a roofing expert so we do not make things worse.
The post preventing leaks with proper chimney flashing this spring first appeared on Taylore Roofing.